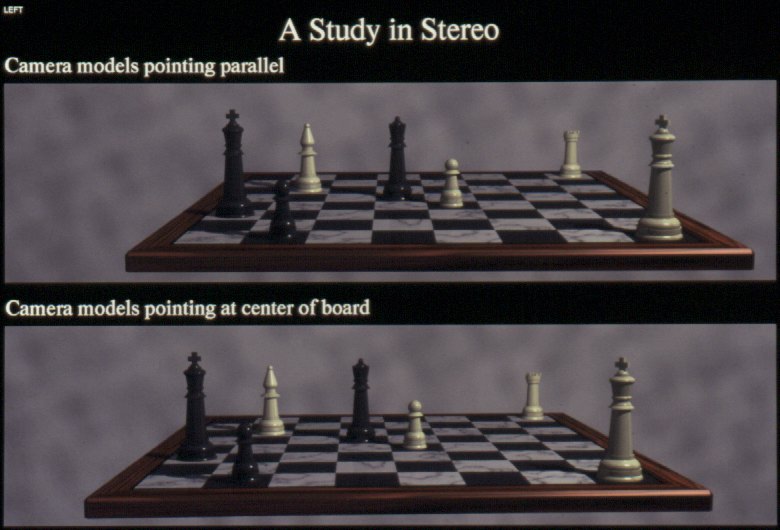
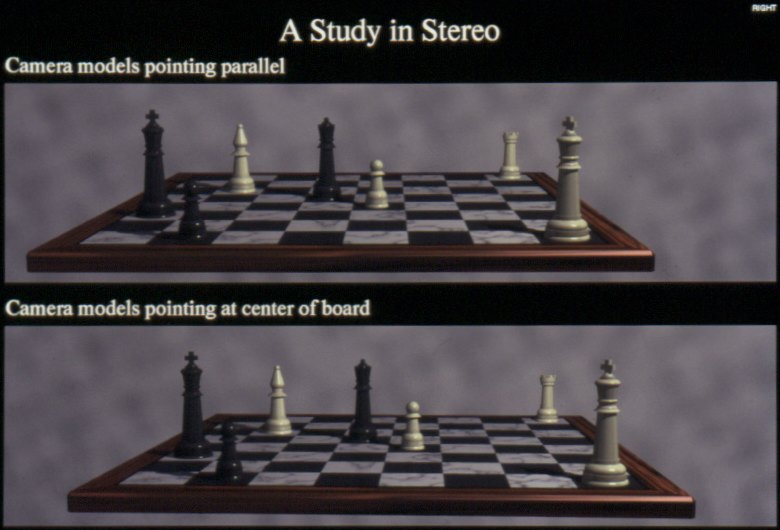
Figure 1 - A Study in Stereo: Comparing Stereo Camera Models
Parellel models (top) and converging models (bottom)
|
|
|
|
Figure 1 - A Study in Stereo: Comparing Stereo Camera Models | |
Jerry Farm

13 May 1993

Stereo Camera Model

The purpose of my experiments in stereo was to determine not only what
the basic requirements are to obtain usable stereo images, but also what
can be done to assure that the images are comfortable to view.  Attention
centered first on the basic geometry of stereo vision and the necessary
camera models.

Stereo vision is based on parallax--the difference in the images seen by
the left and right eye due to the distance between them.  When looking at
an object, each eye generally must look in a slightly different direction
to center on the object, and that difference in direction indicates the
distance to the object.

As an object gets farther from the viewer, the difference in look
directions becomes smaller until, at infinite distance, the eyes are
looking parallel.  In a special case of this, when an object is centered in
front of the viewer at infinite distance, both eyes are looking straight
ahead (along the parallel dashed lines in Figure 2).  To look at an object
which is between these parallel lines but at a finite distance from the
viewer, the left eye must look to the right of straight ahead and the right
eye must look left; to look at an object outside of these parallel lines,
both eyes must look either right or left.

Figure 2 - Stereo Viewing Geometry
A camera model defines the position from which a scene is viewed, the
direction that the camera is looking, and how the scene is to be projected
into a two-dimensional image.  To create a stereo image, two camera models
are needed--one for each eye.  The models are positioned at the general
point of view desired for the scene, but must be separated by a distance
corresponding to the distance between the eyes, or interocular separation,
a distance of roughly 2.5 inches (67 mm).  Note that this should be scaled
if the scene is not scaled to human proportions, e.g., for atoms or
galaxies.  The separation should be made in a direction which is both
normal to the view direction and normal to the viewer's local "up"
direction.   The camera models must be pointing in the same direction
(i.e., they must have parallel view directions) to preserve the stereo
geometry described above.

The final portion of the camera model defines the projection.  For stereo
images a perspective projection should be used.  The position and
orientation of the projection planes should correspond to the image planes
of the equipment to be used to view the stereo image.  Typically the left
and right image planes are coplanar, and thus the projection planes should
be as well.

When the stereo image is viewed, the images must be properly centered in
front of the eyes.  Specifically, the point in an image which contains the
viewing direction ray for that image should be centered directly in front
of the eye.

Note that the original Rayshade stereo camera model alters the viewing
direction of each camera to converge at a look point (typically centered
within a scene), causing the look point to be centered in each eye's image.
This in turn causes the look point, and the entire scene with it, to appear
to be at infinite distance.  The eye is fairly forgiving--even though such
a scene is centered at infinity, the eye can still pick up the relative
depths within the scene.  However, scenes generated with converging camera
models (and then viewed with equipment having parallel image planes) can be
uncomfortable to view, especially for objects behind the look point--the
eyes must actually diverge to look at these objects.  Also, due to the
resulting non-parallel projection planes, distortion causes vertical
misalignments between the left and right images, especially toward the
edges of the images.  The misalignments causes a blurring or a transparent
ghosting of object edges because when one eye looks at the edge the other
eye sees whatever is behind, because for it the object is skewed up or
down.  These effects are observable in the stereo image "A Study In Stereo,"
which compares the Rayshade's converging camera model (bottom half of
Figure 1) with the parallel model (top half of Figure 1).  To render
"Raytracers' Recess", Rayshade was changed to use the parallel model.

Stereo Rendering Tips

Another factor which appeared to affect how comfortably a stereo image may
be viewed, though not affecting the accuracy of the stereo image, is the
presence or absence of objects or regions which only one eye can see.
Based purely on personal observations, it was concluded that a good rule of
thumb is to have each object visible to both eyes.  An object visible to
only one eye will appear to "float", perhaps due to the lack information
from the other eye to fix a distance, or it will appear sort of
transparent as the other eye supplies information from behind the object.
It was also concluded that one should avoid having the appearance of an
object be very different for each eye as this seems hard for the brain to
fuse into a coherent image.

Some examples of things which should be avoided through careful scene
composition and choice of camera position are listed below.

1)  Objects which are visible to one eye but completely hidden to the other
eye by another object.

2)  Extended surfaces visible to one eye and not the other.  For example,
don't look along a wall such that one eye can see along the whole length of
the wall and the other eye sees just the end of the wall and none of the
side.

3)  Very long objects pointed directly or nearly at one eye.  For example,
a long cylinder pointed toward one eye will appear nearly a circle to that
eye, but the other eye may see it much more clearly as a cylinder.  The two
disparate views are difficult to fuse into a coherent image.


In cases where a part of the scene extends beyond the field of view, it is
not possible to follow the rule of keeping things visible to both eyes
simply by choosing the scene composition and camera position.  In these
cases some careful clipping must be performed.

When the scene has a large background which spans the field of view, it is
desirable to  to eliminate the large area on the left visible only to the
left eye, and the similar area on the right (see Figure 2).  Conceptually
this is done by establishing a stereo clipping window which acts like a
physical window, or portal, through which the scene is viewed, eliminating
the undesirable portions of the background.  Note that small regions of the
background still are visible to only one eye, but now these regions are in
a configuration that the eye is used to seeing, namely that of looking
through a hole.  Rayshade was modified to actually perform the stereo
clipping in image space rather than object space by projecting the edge of
the stereo clipping window to the projection plane and leaving all pixels
outside the window black.  This method avoids having to do actual clipping,
an operation which normally isn't provided in a raytracer, and which also
could adversely affect reflections.  A black object actually modelling a
physical window could be defined, but its position and orientation would be
view dependent and it would cast unwanted shadows unless it was handled
specially by the raytracer.

The Rayshade modification places the stereo clipping window at the same
distance from the eyes as the look point, so that typically the window is
centered on the scene.  This gives the visually interesting effect of the
scene projecting out in front of the window.

The method used for stereo clipping still leaves regions in the foreground
visible to only one eye.  For "Raytracers' Recess" this wasn't a problem
since there was nothing which extended into these foreground regions.  For
other scenes it may be desirable to clip these regions, possibly even to
the inside of the common view volume to ensure that both eyes can see the
clipped edge.  Whether these regions should be clipped, and whether the
importance of it depends on the field of view of the viewing hardware, are
subjects for possible future study.  For example, a wide field of view,
real-time/virtual reality terrain viewer may not need the foreground
regions clipped, and indeed would probably look unnatural to have clipped
edges visible, while a typical narrow field of view, static display of
scientific data may benefit from clipping.

The text titles were composited onto the slides after the images were
rendered with Rayshade.  The titles were placed in the same location on
both the left and right slide, causing the titles to appear as if at
infinity.  This causes some confusion as the eyes must adjust back and
forth between infinity and a finite distance when looking back and forth
between the titles and the main image.  In retrospect, it would have been
better to position the text so that it appeared at the same depth as the
center of the scene, i.e., at the stereo clipping window.  It would then
be easy to look back and forth between text and graphic.
Updated: 2001.06.23