Display menu
Standard
Resets the display to the standard settings. This will not affect the Custom settings.
Toggle Lighting
Turns lighting on and off.
Custom
Applies the current set of custom dispay settings to the DEM.
Display Settings...
Opens a dialog box allowing you to edit the display settings. The resulting settings become the new set of Custom settings, which you can then apply to other DEM windows.
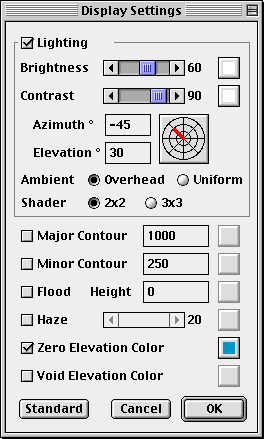
The square buttons on the right side are color buttons you can use to set the colors of the various items. The upper right button is the main light color; the button below it is the ambient light color. Normally these are the same color but they need not be. The contrast slider fades between the main light (at 100) and the ambient light (at 0).
The Azimuth/Elevation control sets the direction of the main light. By dragging in the control you can move the light in real time (if your computer is fast enough!).
The Ambient light can be Overhead or Uniform. Overhead often provides additional realism and makes additional terrain detail visible, but can sometimes make the slopes too dark. Using overhead lighting creates a "slope shading" effect where steeper slopes are shaded darker. Uniform is useful for minimizing detail, but can sometimes give an unrealistic glow to the terrain.
The relief shader can be set to compute terrain slopes using a 2x2 or 3x3 window. The 2x2 window will give shading that aligns better with MacDEM's contours, while the 3x3 window will give shading that aligns better with the DEM elevations, making it easier to pick off peaks and ridges with the cursor. If the shaded relief is to be exported and later overlayed with contours from another source, the 3x3 window may generate shading that aligns better with it.
There are two sets of contours: major and minor. You can select which are active, what their intervals are, and what color they are. The contour lines are most visible if the DEM is viewed at a zoom of 1x or larger. To get finer contour lines, set the zoom to 2x or larger and Resample the DEM to give it a finer horizontal resolution.
Haze creates an elevation-dependent haze--lower elevations get more haze. This can be used to deemphasize terrain details at low elevations. The default haze color is light blue to simulate real atmospheric haze. You may want to set the color to pure white especially when making black-and-white shaded reliefs.
Zero Elevation Color, when active, draws all elevations of zero as the selected color. Useful for distinguishing ocean surface from land surface.
Void Elevation Color, when active, draws all elevations less than -32000 as the selected color. Some DEMs mark ocean samples by setting their elevations to "void". This menu option allows oceans in these data sets to be displayed as blue (or any other color) without changing the data.
Zero Elevation Color and Void Elevation Color behave slightly differently than the other colors in that they are unaffected by lighting changes.
Full Size
Sets the zoom to 1x. At this value one pixel equals one elevation sample.
Zoom Out
Decreases the zoom, making the DEM appear smaller so you can see more of it.
Zoom In
Increases the zoom, making the DEM appear larger so you can see more detail.