File menu
In addition to using the Open menu item, you can open files by selecting them in the Finder and dragging them onto the MacDEM application icon (or an alias). The only exceptions to this are Raw Data files, which must be opened using the Import Raw Data menu item. Drag-and-drop is an easy way to open more than one file at a time, e.g., in preparation for merging files. MacDEM automatically determines the type of each file and interprets it accordingly. Since SDTS-format DEMs must each be in their own folder, you can also drag folders onto the MacDEM icon. MacDEM will scan each folder looking for file names containing ".DDF" to open the SDTS-format DEM contained in the folder.
Open...
Opens a DEM file into a new window. Will open any of these formats:
- MacDEM
- USGS ASCII DEM
- SDTS DEM (note 1)
- DTED
- GLOBE
- GTOPO30 (note 2)
- TerrainBase (note 3)
- Arc ASCII-Grid .asc (note 4)
- SRTM - Shuttle Radar Topography Mission
- PGM (note 5)
- National Elevation Dataset BIL and GridFloat (note 6)
Notes:
- SDTS: In the Open File dialog box you may select any one of
the .DDF files in the SDTS transfer group. MacDEM uses the first four characters
of the selected file name to construct the names of the other files it
needs to open. All files in the transfer group must be in one folder.
For old SDTS files MacDEM overrides the erroneous georeferencing data with values believed to be correct. - GTOPO30: Requires both a *.dem and a *.hdr file. You can pick
either one.
- TerrainBase: Requires both a *.bin and a *.hdr file. You can
pick either one.
- Arc ASCII-Grid: Currently does not use .prj files, assumes units are meters.
- PGM: Originally implemented to allow you to import elevation data prepared by other programs. However, this capability is now better performed by the Import Raw Data menu item. For a description of the PGM file format look here.
- BIL: Requires a *.hdr, *.bil, and *.blw file. You can pick any one to open.
GridFloat: Requires a *.hdr and *.flt (or .bin) file. You can pick either one.
Open MacDEM file...
Opens a MacDEM format DEM file into a new window. Only MacDEM files are shown in the Open File dialog box.
Close
Closes the front window. Prompts you to save if any changes were made.
Save
Saves the front window's DEM in compressed binary MacDEM format. The current display settings and palette are stored too.
Save As...
Saves the front window's DEM in MacDEM format after prompting you for a new file name. The current display settings and palette are stored too.
Import Raw Data...
Reads a Raw Data file into a new window.
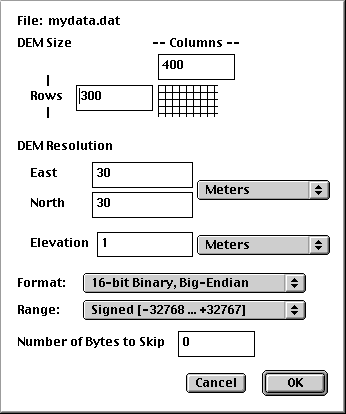
Both ASCII and Binary data files are supported. After selecting a file, the dialog box shown below will appear requiring you to specify certain information about the DEM. You must enter the correct values for the number of Rows and Columns. Note that the "Number of Bytes to Skip" allows you to specify how many bytes should be skipped at the start of the file in case the file has a header. For example, MacDEM's own binary export format has two 2-byte integers at the start to specify the size of the DEM; you would enter 4 for the number of bytes to skip to read one of these files. In this case you would also select a DEM Format of "16-bit Binary, Big-Endian."
After the file is loaded, you can use the Set DEM Origin command in the Edit menu to specify the location of the DEM.
Export Elevation Data to BINA...
Saves the front window's DEM elevation data to a binary file with file type set to BINA. All data are stored in big-endian form (high-byte first). The file contains:
- #rows - 16-bit integer height or y-size
- #columns - 16-bit integer width or x-size
- elevation data - a total of (#rows) * (#columns) 16-bit integer elevations
Export Elevation Data to PGM...
Saves the front window's DEM elevation data to a Portable Gray Map file with the file type set to TEXT. This allows you to export elevation data to other programs, such as Bryce4. See PGM File Format for a description of the PGM file format.
Tips for Importing a PGM File into Bryce4
- Use Bryce's "Import Object..." command to import the PGM.
- Immediately after importing a PGM into Bryce, Group the data if the Group command is available. Bryce will split large PGM files into tiles; grouping the tiles will preserve their relative positions for the next step.
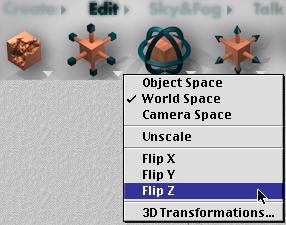
- Click on Edit, then click on the white triangle to bring up the menu shown below. Select Flip Z to restore the DEM to the correct orientation. Flip X will also work.
Export Elevation Data to POV-Ray TARGA...
Saves the front window's DEM elevation data to a TARGA (.tga) file for import into POV-Ray. This menu item also creates a ".pov" scene file which scales the DEM to its actual size. You will be prompted twice for file names: once for the TARGA file, and once for the POV scene file.
Double click the scene file or open it in POV-Ray, then use POV-Ray's Render command to generate a 3-D perspective view of the DEM. (See the MacDEM web site for a link to download POV-Ray.) You can also drape images over terrain using POV-Ray.
Setting Gamma for older versions of POV-Ray
If you are using a version of POV-Ray older than version 3.1, you should set up the POV-Ray init file to define the default gamma setting if you haven't already done so. Otherwise your images may come out too dark. In the same folder as the POV-Ray application, there should be a file called something like POVRAY.ini-x.
- Rename it to POVRAY.ini
- Edit the POVRAY.ini file to delete the semicolon at the start of the
line:
Display_Gamma=1.8
A value of 1.8 is probably OK for most Mac systems. You can find out what value to use by downloading these two files and following the instructions in the text file.
http://www.povray.org/binaries/gamma.gif.txt
http://www.povray.org/binaries/gamma.gif
Export Elevation Data to Photoshop 16-bit...
Saves the front window's DEM elevation data to a Photoshop (.psd) file. The data is saved in 16-bit format to preserve resolution. Since the data is stored in binary form, the files are smaller than PGM files. If the DEM does not have very high elevations it may look like it is all black in Photoshop. You can use the Normalize menu item in MacDEM before exporting to Photoshop to "brighten" the image, though this may introduce vertical exaggeration depending on how the data is used later. You can also use Photoshop's Levels command to do this. This scales the elevations to larger values so they are "brighter". Be careful not to saturate the elevations or you'll end up with flat-topped peaks. Avoid the auto-levels command for the same reason.
Export Elevation Data to USGS ASCII...
Saves the front window's DEM elevation data to a USGS ASCII DEM file.
With the "USGS ASCII chop" exporter, instead of padding records to the proper length with spaces, linefeeds are inserted into the file to break it into records. The chopped format is non-standard, but some other programs need this format to be able to read the file. MacDEM saved to this format prior to version 1.10.
Export Image to PICT...
Saves the front window's DEM display to a PICT file using the current shading and palette options. The PICT is saved in 24-bit color at full size, i.e., with zoom set to 1x. Images wider than 4095 columns must be saved in TARGA or TIFF format.
Export Image to TARGA...
Saves the front window's DEM display to a TARGA file using the current shading and palette options. The TARGA is saved in 24-bit color at full size, i.e., with zoom set to 1x. The image may be up to 32767 columns wide.
Export Image to TIFF...
Saves the front window's DEM display to a TIFF file using the current shading and palette options. The TIFF is saved in 24-bit color at full size, i.e., with zoom set to 1x. The image may be up to 4 billion columns wide, in theory, though MacDEM will only support DEMs that are 32K columns wide.
Write World File...
Writes the front window's geopositioning and scale data to a "world file" with a default file extension of ".tfw". Some GIS applications understand world files and can use them to geoposition TIFF files.
Open Settings...
Opens a MacDEM settings file, which can contain shading and palette information. The settings are applied to the front window.
Save Settings...
Saves the front window's display settings and/or palette to a MacDEM settings file. In the file save dialog that appears, you can select whether to save the display settings, the palette, or both.
Quit
Quits MacDEM.